Exchange 2019 in a Home Lab with a Dynamic IP and Blocked Port 25

A recruiter recently submitted me for a Microsoft Exchange project even though I knew almost nothing about Exchange. Well, I thought, it wouldn’t hurt to learn. The learning process was quite an ordeal, mostly because Exchange in a home lab is quite different from Exchange in a commercial environment. First of all it can be a challenge when you run Microsoft Exchange in a home lab with a dynamic IP and your ISP blocks port 25. This article is all about how to get around those hurdles. I ran into another hurdle when I discovered a trial download of Exchange is generally unavailable, at least not one I could find. If you want to download Exchange, you need to be on a Volume License Agreement or buy a copy. The retail version of Exchange can be very expensive for home users, but if you shop around, you should be able to find a copy for a reasonable price (Google is your friend). I was going to suggest download Exchange from Technet, but I just discovered Microsoft doesn’t offer Technet subscriptions anymore.
I wanted to run my home lab cheaply as possible. I did not want to pay the relatively high cost to lease a static IP address. There are ways to get around that but there are other problems associated with having a dynamic IP address. I will describe how I got around the problems associated with not having a static IP. I will describe here what I did to get my home lab up and running. It took many Google searches to find what I need to make Exchange work in my home lab. And it wasn’t all in one place. I would run into a problem, search for an answer, then run into a new problem and the new answer was in an entirely different place. The answers weren’t always clear or complete. My goal here is to compile what I found and put it in a single place. Hopefully Google will find my site so your Google searches will point here and help you to make your home lab work. The goal of this posting is to help you set up your home lab. I’m going to cover the basics about installing Exchange, but I do not plan on going into great detail. There are a bunch of articles and YouTube videos about how to install Exchange. I help you get Exchange installed but the goal here is to help you configure Exchange to run in your home lab – after Exchange is installed. Specifically how to get Exchange running without a static IP address and what to do when your ISP blocks port 25. The cost is about $30.97 per year, plus the cost of Exchange. Please allow me to give a standard disclaimer. The solutions presented here worked for me. I’m providing these solutions in the hope you will find them useful. As always, you will need to determine if the solutions outlined here are appropriate for you. Every environment is different. These worked for me, don’t sue me if they don’t work for you or if you follow my cookbook and your stove catches on fire.
Before getting started, you will need to determine how your ISP connects you to the Internet.
This article assumes your ISP connects you directly to the Internet. In my environment, all the devices in my home use non-routable IP addresses. This means my computers could see servers on the Internet but Internet could not see my computers. You will need the Internet to be able to see your Exchange Edge server. No problem. This article explains how to configure your home-router to attach devices in your home to the Internet. Here’s the caution. This article assumes the IP address on the Internet side of your router is routable. In other words a real IP address. In the past, I used an ISP where the IP address of the Internet facing side of my router was also non-routable. My router was not directly connected to the Internet. The Internet would not be able to see my Edge server. If this applies to you, you are out of luck. You will need to lease a static-IP.
The next thing to know is Exchange 2019 is only supported on Windows Server 2019, and you need a 64 bit computer. Since Exchange typically has a mailbox server and an Edge server (more on that later), you will need two servers. At least the servers can be virtual and Windows Server 2019 is available for evaluation download. I do have a rather extensive home lab, so I had the iron to run Windows 2019 and Exchange 2019. Windows Server with Exchange will run on a desktop class machine, and you can buy them rather inexpensively on Ebay, sometimes for less than $100. My 8 GB desktop machine will run Windows and Exchange 2019 but I could not install an additional virtualized Windows 2019 on the same machine – not enough memory. I didn’t find that out until after I installed Exchange. Fortunately, I do have an extra Windows Server 2016 in my lab with 16 GB. I was able to install a virtualized Windows 2019 server running the Edge server under Hyper-V on Windows 2016. I probably could have installed two virtualized 2019 servers with Exchange and Exchange Edge on my 16 GB Windows 2016 machine but didn’t think to do that until it was too late.
If you are curious, this is what I have in my lab:
HP Compaq Pro 6300 SFF
Intel Pentium CPU G870 3.1 GHZ
8192 KB
HP Compaq Pro 6300 SFF
Intel Core CPU I5-3470 CPU 3.2 GHZ
16384 GB
If you have two computers with adequate memory, you won’t need Hyper-V. If you only have one computer, you will need Hyper-V or other virtualization software. It’s important to know what kind of processor you need if you want to run Hyper-V. Windows Server is not very finicky about the hardware it runs on. UNLESS you want to run Hyper-V virtualization. Hyper-V requires BOTH a virtualization enabled processor (VT-x on Intel CPU’s) AND Second Level Address Translation, AND a MINIMUM of 4 GB. (I wouldn’t try running Exchange on a 4G machine). If you are looking at processor specs, you often won’t see Second Level Address Translation. Instead, look for “Extended Page Tables” The first time I tried to run Hyper-V, I didn’t know about all the processor requirements and was disappointed when I discovered I didn’t have the necessary CPU. Finally, Virtualization Technology isn’t usually enabled by default in the BIOS. You will probably need to activate it on your computer. Since there are many kinds of computers and many different BIOS settings, I’m not going to get into detail about how to activate virtualization. Boot into BIOS and look for it. This is an example of how to turn it on in the BIOS:

If you can’t find Virtualization in your BIOS, do a Google search. If you find it in Google, and can’t figure out how to get into your BIOS and activate Virtualization on your computer, you can buy two computers run Exchange on one, and Edge on the other and you won’t need Hyper-V.
Getting Started
Before installing the Exchange Mailbox server, you will need to have an Active Directory environment. Active Directory does not need to be 2019, it can be an older version. The AD domain controller in my home lab is 2016, running on a different server. The Mailbox server should be joined to the Active Directory. The Edge server should NOT be joined to AD.
I learned how to install Exchange from a Lynda on-line video “Deploying Exchange Server 2019 with Robert McMillen”. Lynda.com offers all types of on-line classes using a subscription model. Pay a monthly subscription fee and you get access to their on-line classes. However – if you have a library card, you may be able to get access for free. I live in Jefferson County, Colorado, and the Jefferson County library system offers free access to Lynda.com for their patrons. Other library systems do too. Check out your local library. There is no reason anyone should be without a library card. The Lynda video wasn’t complete and had some misleading parts – especially about installing SSL certificates. If you have deep pockets and can afford to pay hundreds of dollars for a certificate, you can follow the SSL procedure in the Lynda video, and pay all the other costs associated with a commercial Exchange environment
Youtube also has videos on how to install Exchange 2019.
“https://www.youtube.com/watch?v=vQkUkiEHWw0”
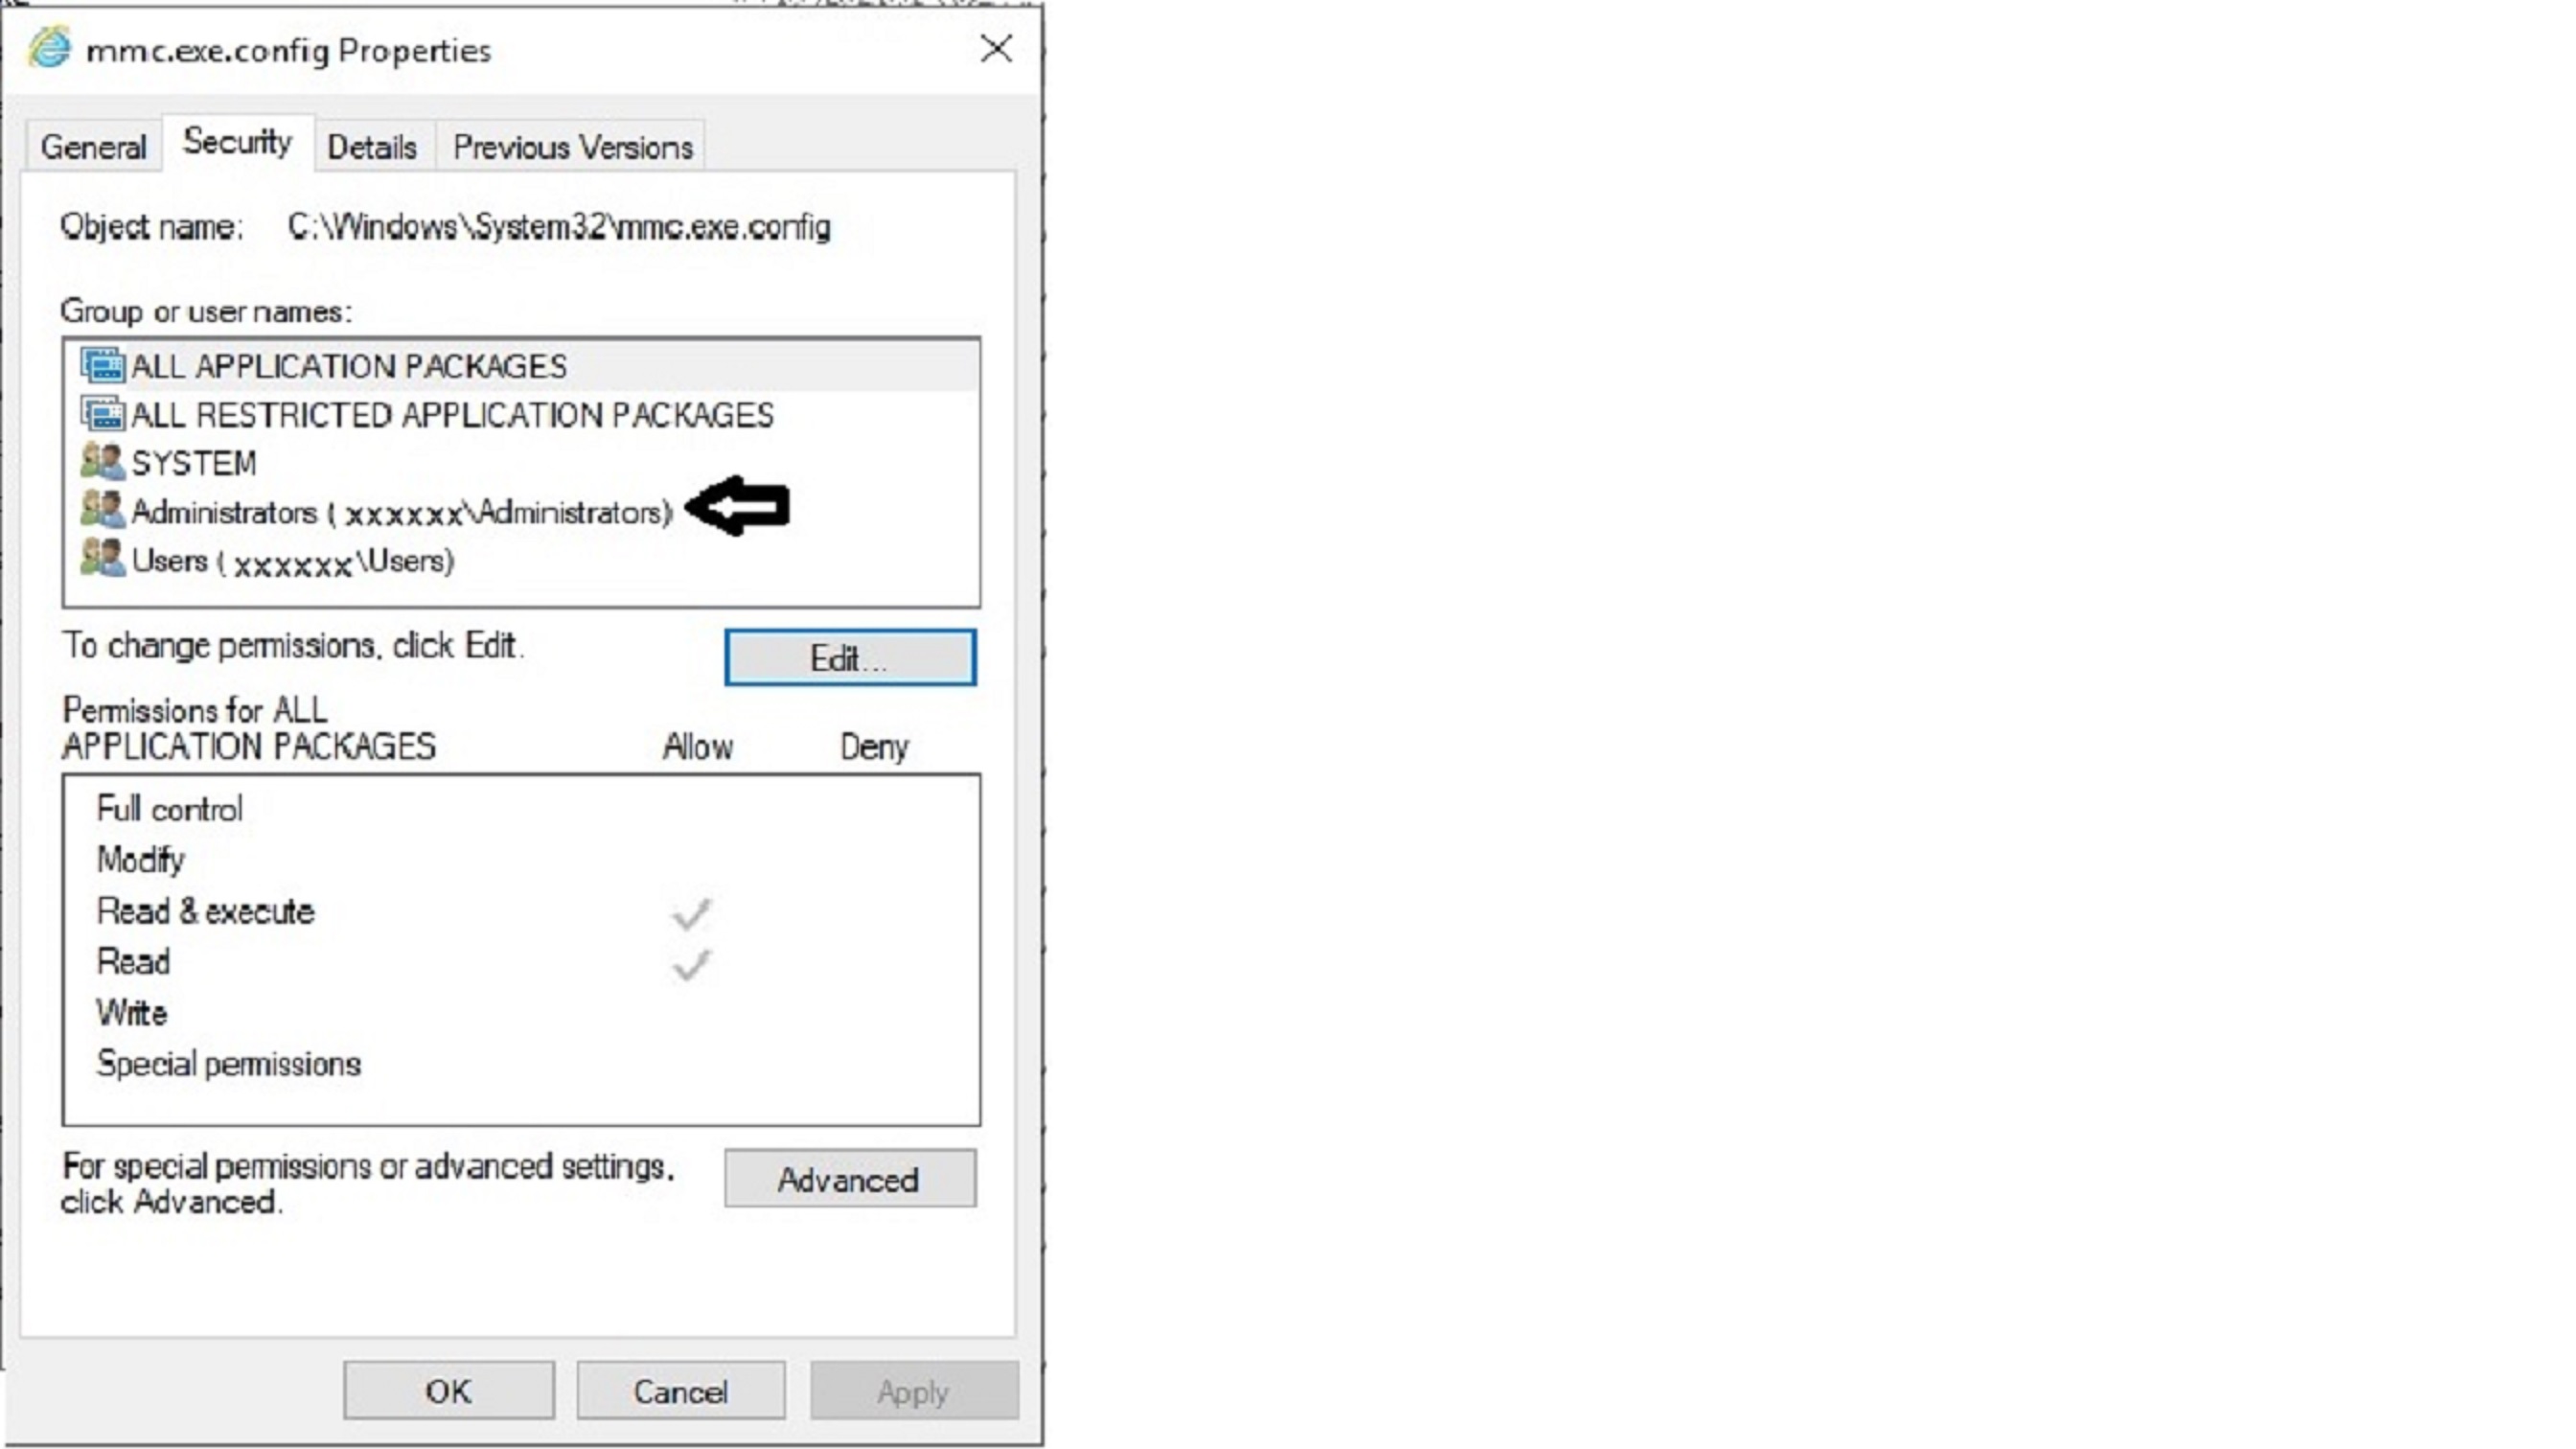
The installation videos I’ve seen do not show the “access denied” error I encountered. Maybe it’s just me. The error was on c:\Windows\System32\mmc.exe.config. Apparently the administrator accounts couldn’t update the file during the install. The solution was rather simple. Before you begin your install, update the c:\Windows\System32\mmc.exe.config \properties\security to add the administrators
Youtube and other videos will show the install will report missing components. This is normal. When you get to that point, just install the recommended software then continue with the installation.
Installation of the Edge server is basically the same, EXCEPT Edge is installed on a DIFFERENT server and when installing select “Edge Transport Role’ instead of “Mailbox Role”. Edge should NOT be installed on a computer joined to Active Directory. The whole point is Edge runs in the perimeter network (DMZ). You do not want Active Directory or any other internal apps running on the Edge server. The idea behind Edge is that in order to receive email, you need open ports. This is a potential opening for Internet attacks. By not being part of Active Directory, and by running on a dedicated server, Edge is designed to minimize the attack posture.
Now there is some work that may be need to DNS. You will need MX records on your internal DNS. Hopefully I have what you need to do that below:
(use your mailserver name and domain name in the places indicated)
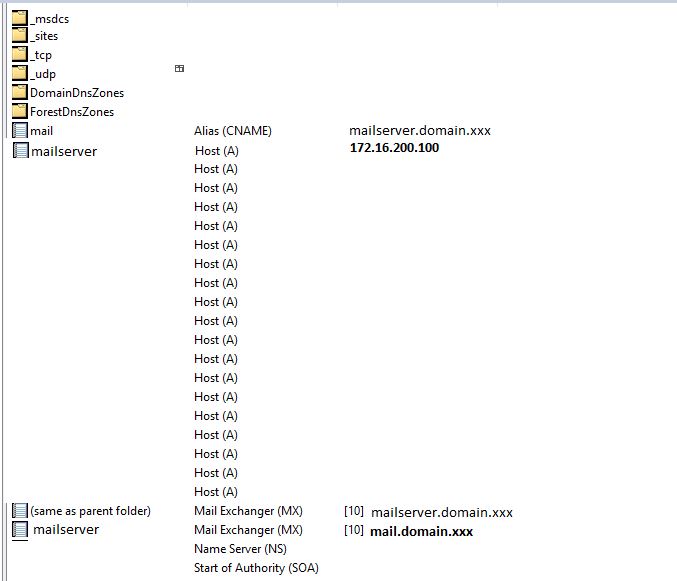
I don’t know for sure if it was necessary, but I also set up an alias for my mail. If your server is [mailserver].domainname.com. your mail server alias will be mail.domainname.com
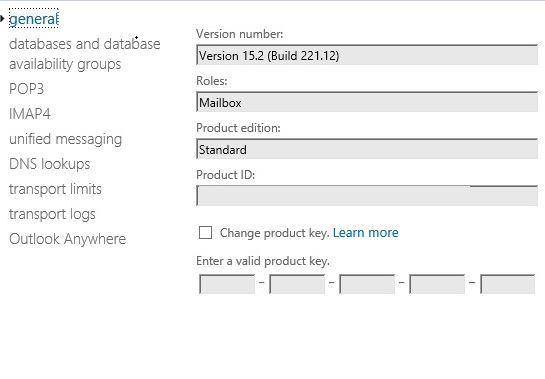
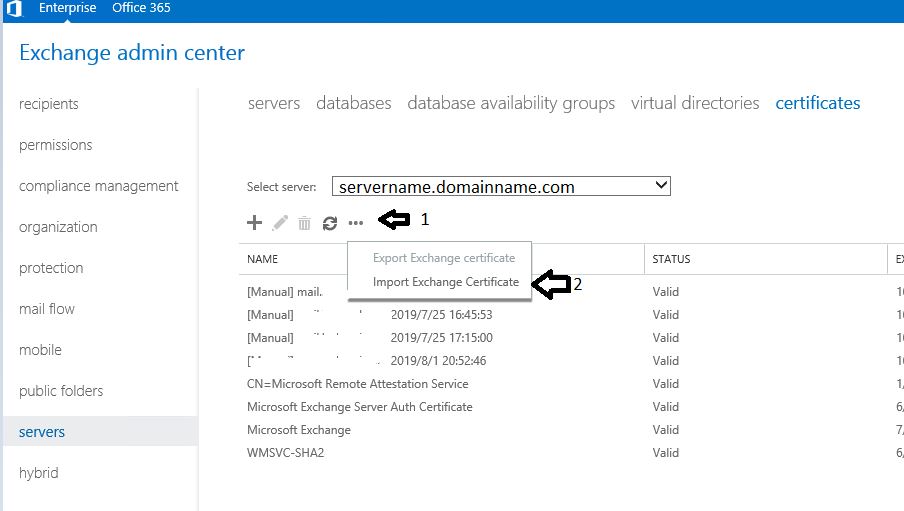
If you have them, now would be a good time to install the activation keys. If you don’t have keys, Exchange will run for a limited time trial.
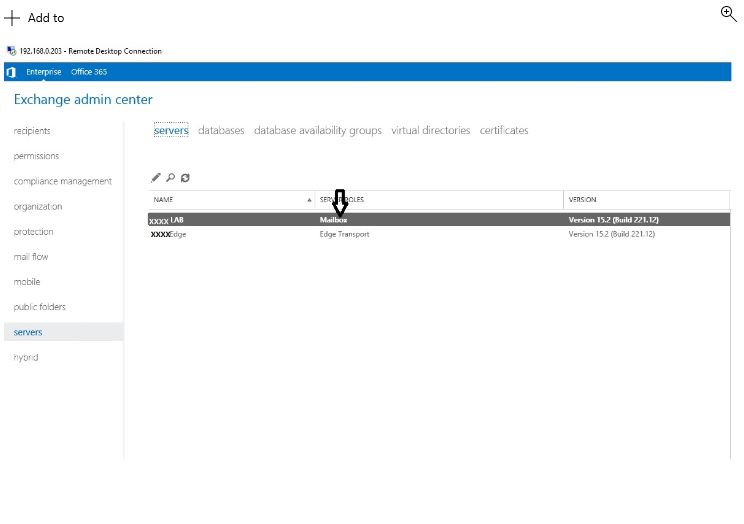
The two screenshots below are for the Mailbox server. Entering the Mailbox server key is a straight-forward process.
You do not enter the key for the Edge server through the Exchange Admin Center. If you try, you will get an error – something like:
“An error occurred while accessing the registry on the server “[name of Edge server]”. The error that occurred is: “The network path was not found. “.
-or-
An error occurred while accessing the registry on the server “[name of Edge server]”. The error that occurred is: “Attempted to perform an unauthorized operation.”
That’s because the Edge server is not in Active Directory and Exchange Admin Center on the mailbox server doesn’t have AD access to the Edge server. Therefore, don’t worry about the error.
Instead, enter the Edge activation key with PowerShell. Be advised that Exchange and Edge have their own PowerShell environment. In order to use PowerShell in Exchange or Edge, you need to be in the “Exchange Management Shell”. You get to that from the microsoft Exchange Folder in the Start Menu. Exchange PowerShell commands will not work in the standard PowerShell
You enter the key for the Edge server as follows:
Set-ExchangeServer “[name of Edge server]” -ProductKey xxxxx-xxxxx-xxxxx-xxxxx-xxxxx
The next step is to set up the connection between the Mailbox server and the Edge server. There are some pretty good Youtube videos on how to do that. This video is for 2016, but 2019 is pretty much the same
“https://www.youtube.com/watch?v=2ZL4XMNa47M”
There is a pretty long command string in the video, so I will help you out by putting them here so you can copy and paste:
On Edge server: new-edgesubscription -filename “c:\program files\microsoft\exchange server\edge.xml”
After creating the .xml file, you will need to move the file from the Edge server to the Mailbox server (do not leave it on the Edge server. Doing so could be a security exposure.
On the Mailbox server: new-edgesubscription -filedata ([byte[]]$(get-content -path “c:\program files\microsoft\exchange server\edge.xml” -Encoding Byte -Readcount 0)) -Site “Default-First-Site-Name”
The path in my example is where I decided to put the Edge .xml file, but you can put it anywhere you want.
Keep in mind the file is only good for 24 hours. You can keep the file in the event you need to re-run the step. After 24 hours, it’s a good idea to delete the xml. After 24 hours, it’s no good any way.
After creating the Edge subscription, you need to do the Edge Synchronization:
From Mailbox server: start-edgesynchronization
Running in a Home Lab with a Dynamic IP and Your ISP Blocks Port 25
Hopefully I have given you enough detail for you to get Exchange and Edge installed. I found the process relatively straight-forward. Where I had questions, it was generally pretty easy to find web sites and YouTube videos to help me find the answers.
Now comes the part that was difficult for me. Getting it to run from my home lab. And most importantly, getting it to run inexpensively. Most commercial environments have static IP addresses. Companies lease fixed IP addresses. As long as they pay, they can keep their fixed IP addresses. Home users can also lease static IP addresses. Having static IP addresses make things much easier. The IP address remains the same, ISPs will usually unblock mail ports such as port 25, and you can assign your static IP to your domain name. A static IP address and an unblocked port 25 make it MUCH easier to set up a home Exchange lab. The only problem is you must be willing to PAY for a static IP address. For example, CenturyLink charges a $75 set-up fee and a $10 monthly charge for one static IP. Like many home users, I wanted to do this on the CHEAP.
If you as a home lab user want to do this as inexpensively as possible but are willing to invest time and aggravation, there is a way. Since I set up my home Exchange lab as a learning project, I was willing to invest the time. And BOY, did I learn!
First, you can avoid paying for a static IP. There are companies that will tie a domain name to a dynamic IP address used by most residential customers. Set up a domain with the provider and run an agent on a computer that’s on your internal network. The agent contacts the provider and when the dynamic IP address changes, the provider updates the DNS and voilà the IP for your domain name is updated. Previously, I used noip.com to provide the service. The cost is $29.95 if you want to use your own domain name. The agent automatically updates the DNS for your domain – no intervention required. If you are OK with using a subdomain of noip.com (subdomain.noip.com) and are willing to manually confirm your IP every 30 days, and do not need an SSL certificate from a Trusted Certificate Authority, the service is free. I used noip.com for years, until I set up my home Exchange lab. Then I discovered the extra features to make Exchange work with noip.com were cost prohibitive. Leasing a static IP would have been cheaper. I did find another company that offered a better proce (keep reading)
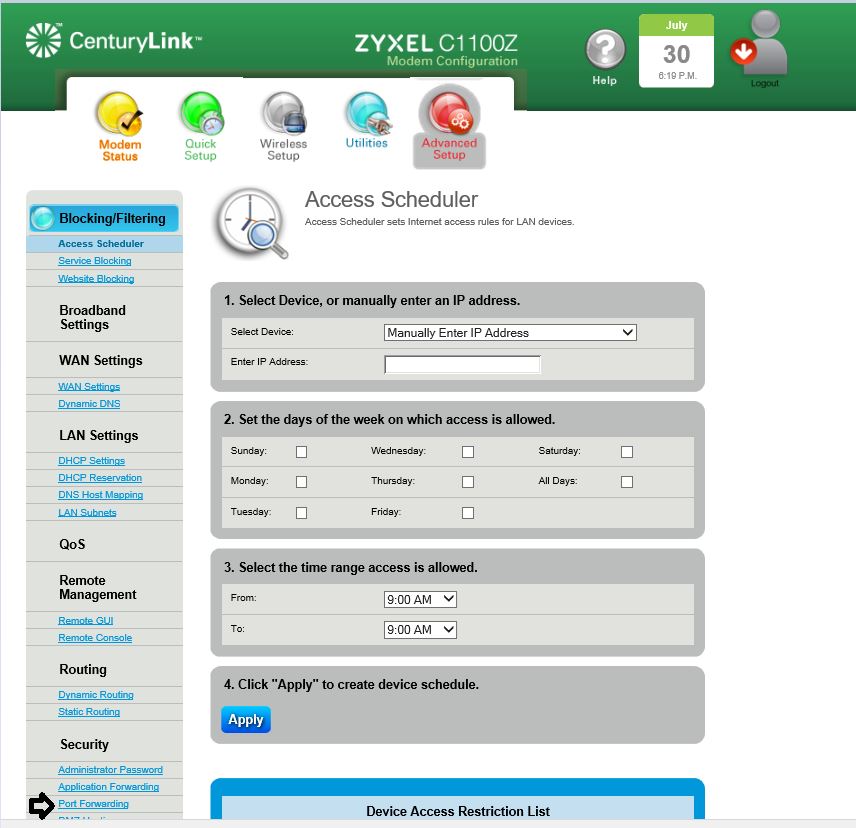
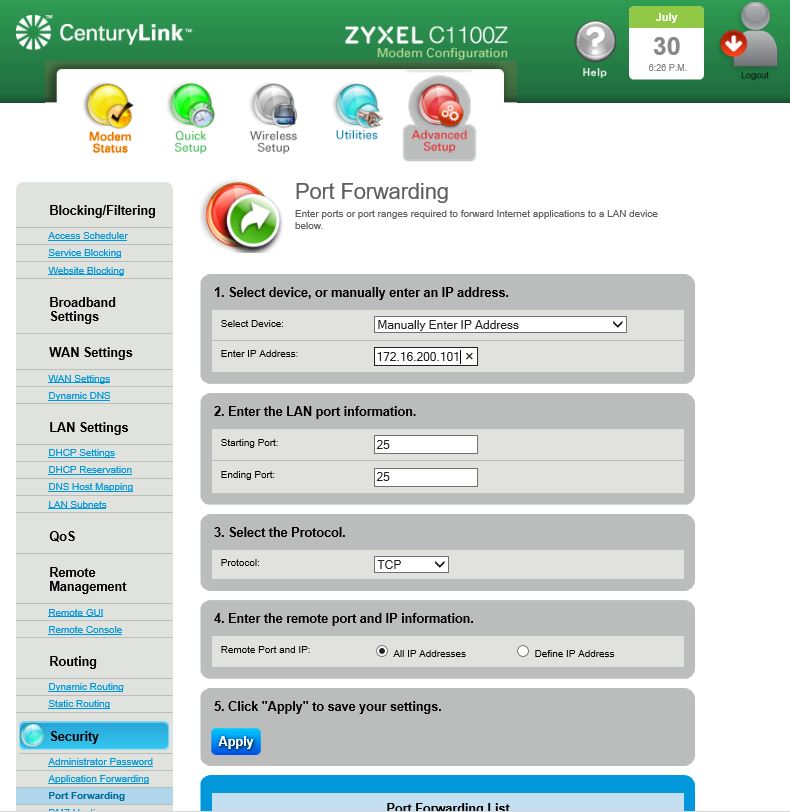
Most home users have a router that works as a NAT – Network Address Translation. The home router acts as a firewall. Outside users are unable to access your internal network. This is generally a good thing. You don’t want outsiders accessing your internal network. But now, with an Exchange server you want to receive emails. To do that you need to open port 25 so incoming emails can reach your Edge server. Simple enough. Most home routers have port forwarding. The configuration for different routers are going to be a little different, but here’s the gist. On your router you can say if you get incoming traffic on port 25, allow the traffic through and send it to the IP address of your Edge server. For example, 172.16.200.101 (IP addresses on your network will probably be different).
Here’s an example of a ZYXEL C100Z on CenturyLink Note Port 25 is forward to the internal Edge server:
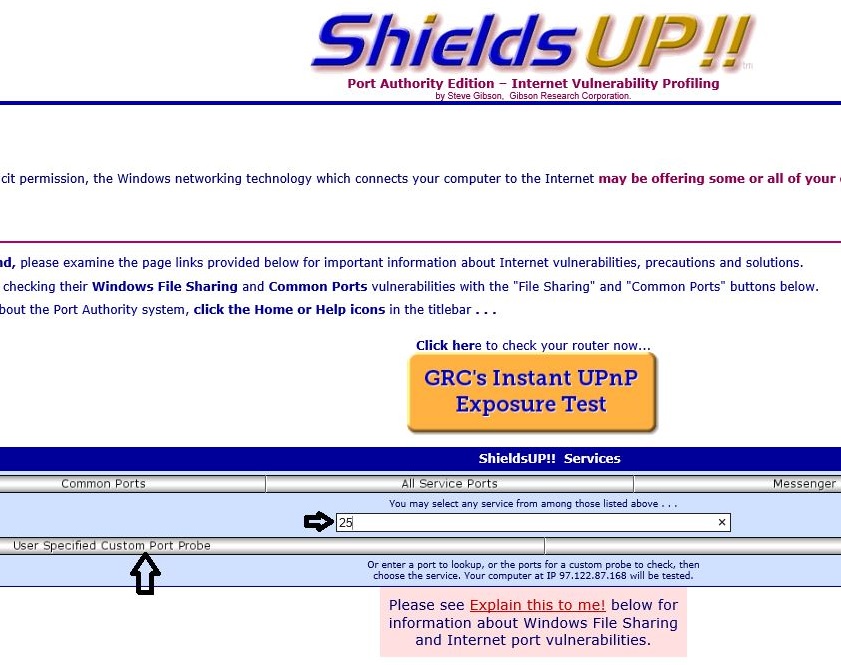
You can test your ports by going to Gibson Research ShieldsUP!
https://www.grc.com/x/ne.dll?bh0bkyd2
Here’s how to check for an open port 25
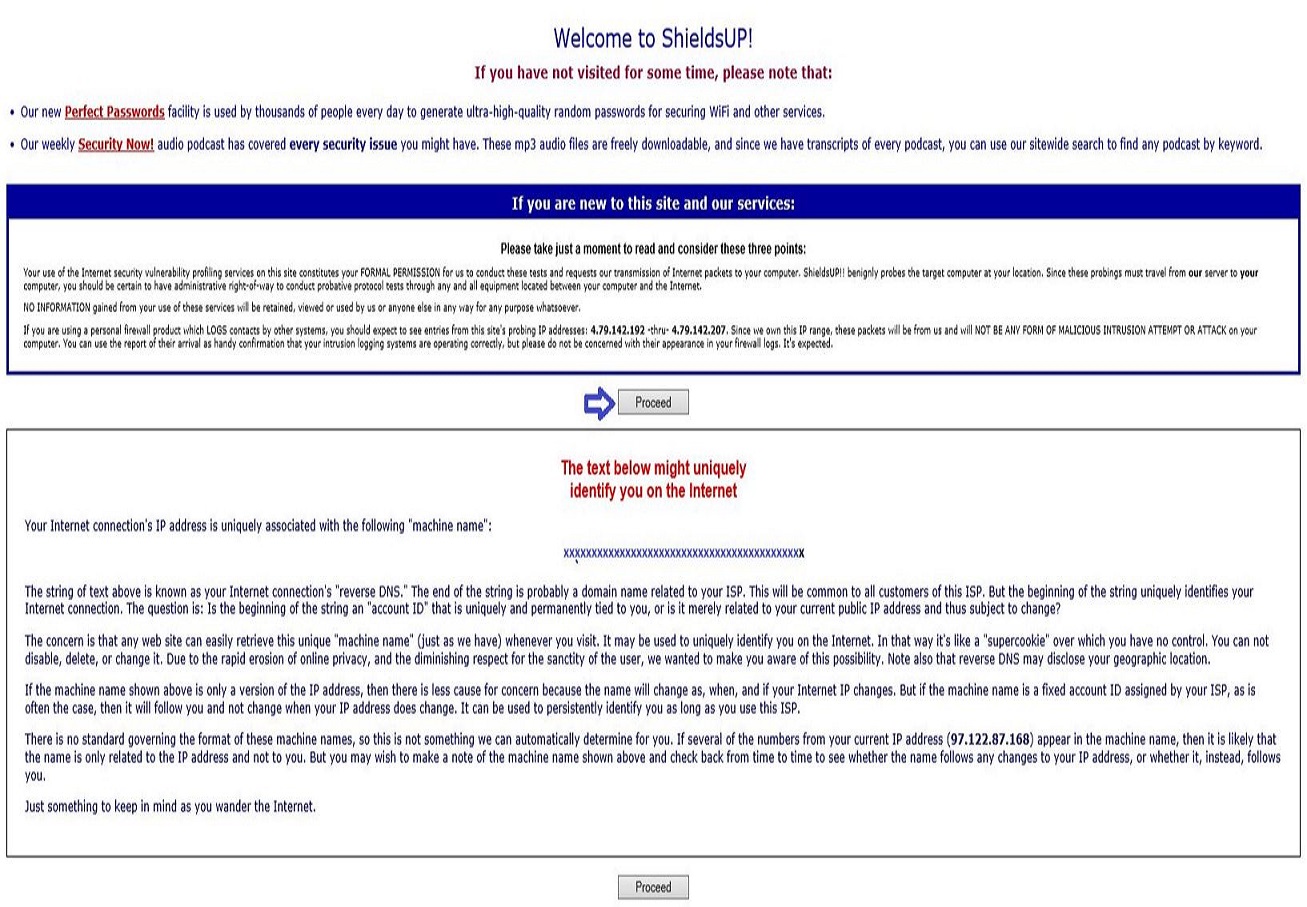
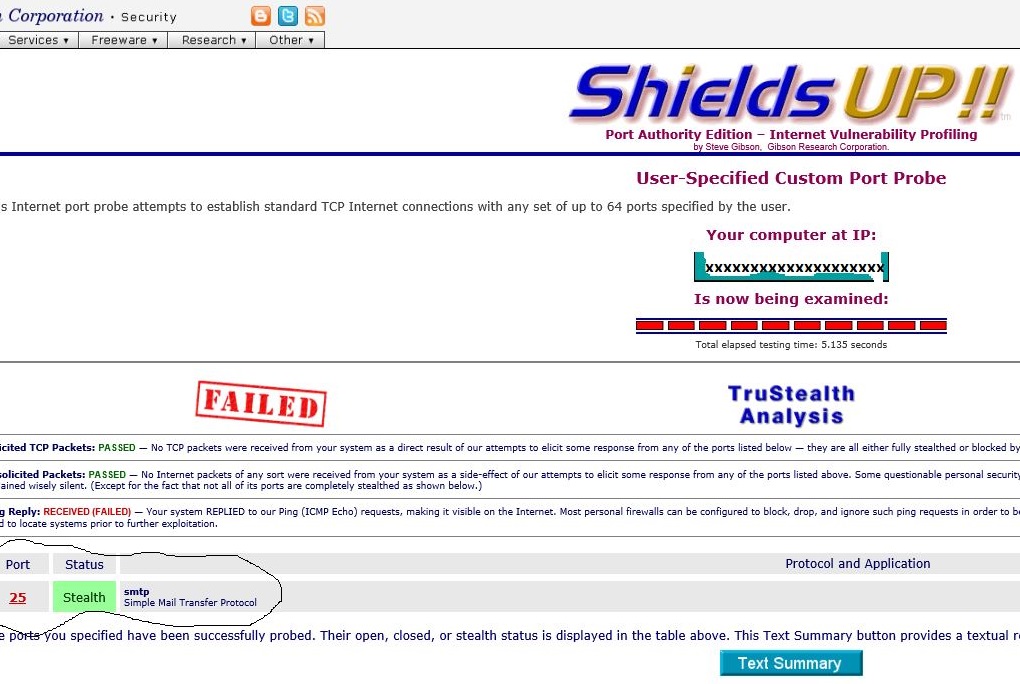
It didn’t work. “Stealth” means the port is completely closed and not responding. That’s when I discovered my ISP blocks both incoming port 25 AND outgoing port 25. Most ISPs will block out-going port 25. Many will block incoming port 25 too. The blocked ports mean there is no way to send or receive outside email on my Exchange server! 🙁 That was my first roadblock trying to run Exchange on my home lab
Then I discovered dynu.com. Dynu offers the same services as noip.com but at a lower price. Like noip.com if you use a subdomain of dynu.com, the service is free. If you want to use your own domain name, you only pay for the domain registration. $10.99 for a .com domain.
But that doesn’t solve the blocked port problem. Fortunately, dynu.com does have a solution. Use a different port for incoming and outgoing email. The outside sends and receive emails using port 25. The dynu.com “Smtp Outbound Relay” smarthost will accept email from your Exchange server (usually on port 2525), and sent it out on port 25. Their “Email Store/Forward” will accept incoming emails on port 25 and send it to your Edge server on another port, usually 2525. The cost is $9.99 per year each. So for the domain and email services, the total annual cost is $30.97. Noip.com offers the same services but they’re quite a bit more expensive. I transferred my domain from noip.com to dynu.com. It was quite easy. I called noip.com and requested a domain transfer authorization code. Getting through to their tech support line was difficult, but once I got someone on the line, it was easy and fast. Incidentally make sure your noip domain isn’t locked. You can then log on to dynu’s website, enter your domain name, the authorization code from noip, pay the $10.99 domain registration cost and that’s it. The whole process from requesting the authorization code to completing the transfer only took a couple of hours. Incidentally when you pay the domain fee with dynu they extend your existing domain by a year. So, when I transferred my domain, I received the one year of domain registration plus what I had left on my registration with noip.com.
The next chalange was figuring how to make Exchange work on different ports. You also need to configure the dynu services and DNS
To change the in-coming port, log-on to the Edge server, start the Exchange Management Shell (not the regular PowerShell), then determine the name of your receive connector:
get-receiveconnector
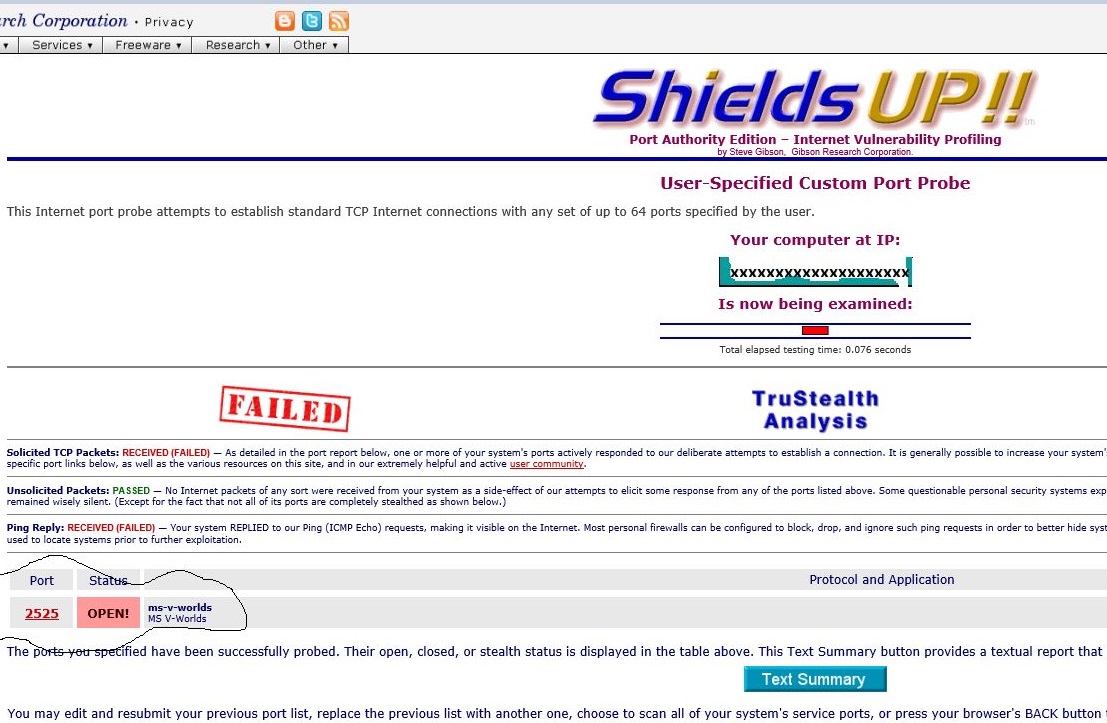
Then change the incoming mail port. In the example below, I’m using port 2525, one of the dynu.com port numbers you can use to send and receice emails.
set-ReceiveConnector “[identity of receive connector]” -bindings “0.0.0.0:2525”
Then you need to set port forwarding on your router to forward port 2525 to internal the IP address of your Edge server. See the previous forwarding example above – instead of forwarding port 25, forward port 2525.
When you test your port forwarding, the port should show open:
While you’re at it, you should forward port 443 to your mailbox server. That will enable you to have https access for your web mail client and Exchange Admin Center.
Also forward port 80 to your mailbox server too. You will need that if you want a free SSL from the letsencrypt Trusted Certificate Authority (more later)
Check your Windows Firewall on your Mailbox and Edge servers to ensure your ports aren’t blocked. 443 & 2525.
Finally, you need to configure your dynu.com Email Store/Forward service: https://www.dynu.com/Resources/Tutorials/EmailServices/EmailServiceSetup/EmailStoreForward
If you need help configuring any of the dynu services, open a support ticket with them. I found dynu’s technical support to be responsive and helpful.
There is no logon or smarthost needed to receive email.
To send email you configure your Exchange server to connect to the dynu.com smarthost.
First, you need to change the outgoing port, log-on to the Mailbox server. Start the Exchange Management Shell (not the regular PowerShell), then determine the name of your send connectors
get-sendconnector
If you have properly set up your Edge subscription, you should see something like:

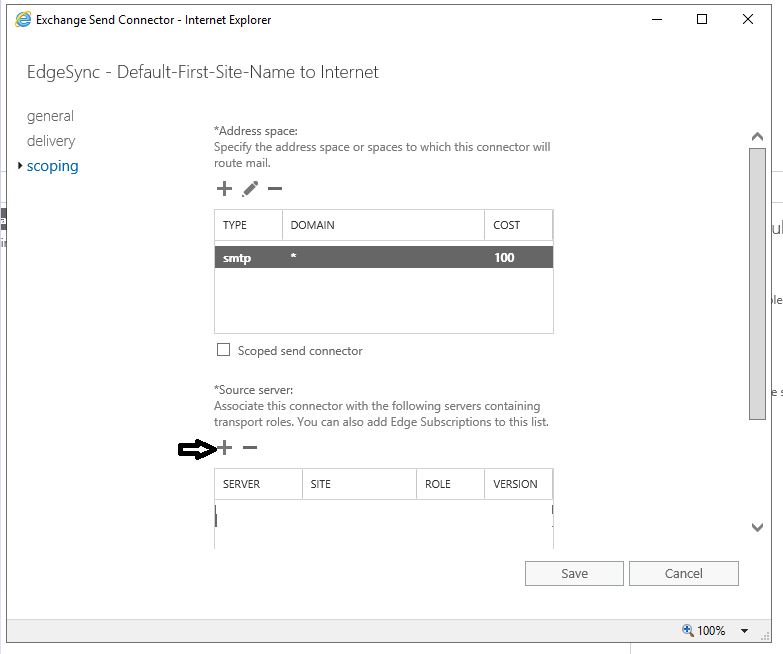
Then, you will need to change the port of your ourbound port as follows:
set-sendconnector “EdgeSync – Default-First-Site-Name to Internet” -port 2525
You will need to configure your dynu smarthost: https://www.dynu.com/Resources/Tutorials/EmailServices/EmailServiceSetup/Email-SMTP-Outbound-Relay
The included DKIM instructions will show you how to digitally sign your outgoing emails. Dynu will provide the signed keys for your outgoing emails. No need to buy one or get one from somewhere else
After configuring dynu, set up your sendconnector to use an external DNS. You will need to use an external DNS in order to send email to the Internet (at least I did)
set-transportservice [name of your mailbox server] -externaldnsservers 8.8.8.8 — You can use a public DNS of your choice.
“8.8.8.8 is a public Google DNS. Google DNS service is free to use and can be used by anyone who has access to the Internet”
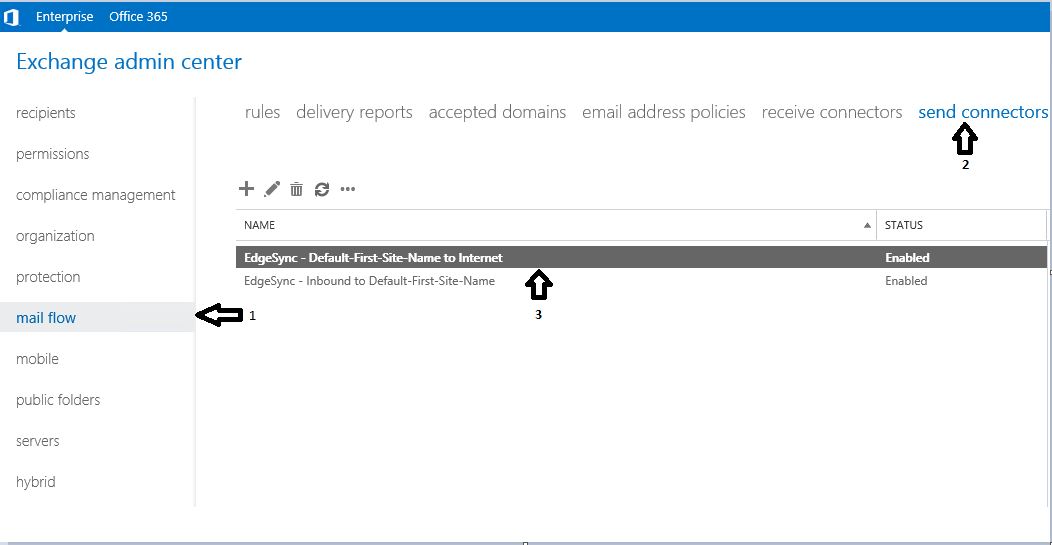
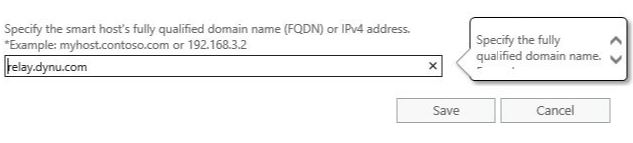
After setting up SMTP outbound relay service in dynu, and your external DNS, you will need to set up your smarthost connection via your Exchange Management Console
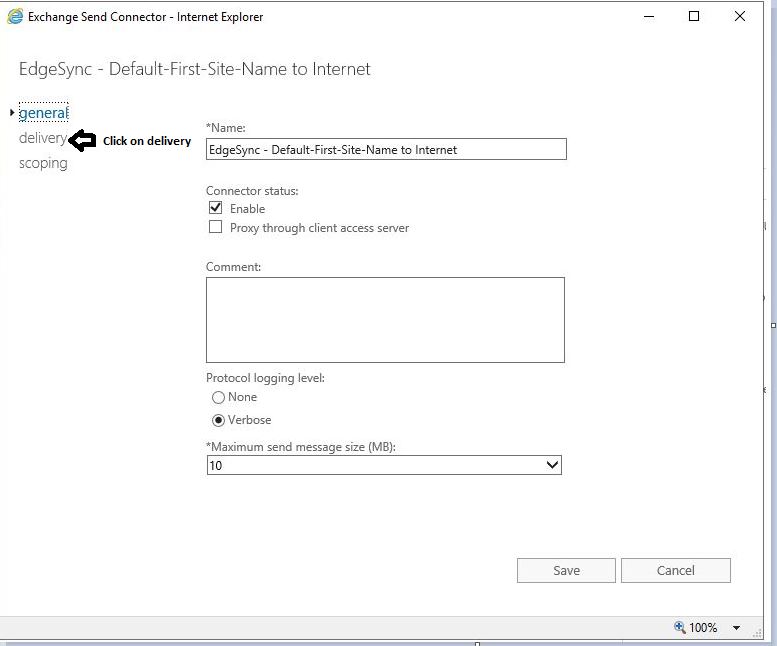
Start by logging on to your Exchange admin center, click on “mail flow” on the left, then “default first site to Internet”, then click on “send connectors”
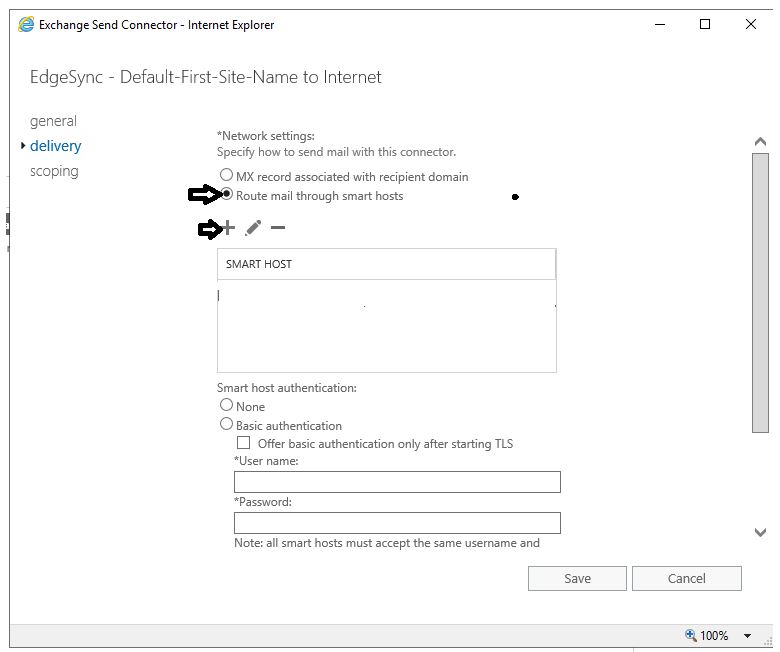
The User name and password below are from dynu.com when you configured the dynu.com smtp outbound relay service


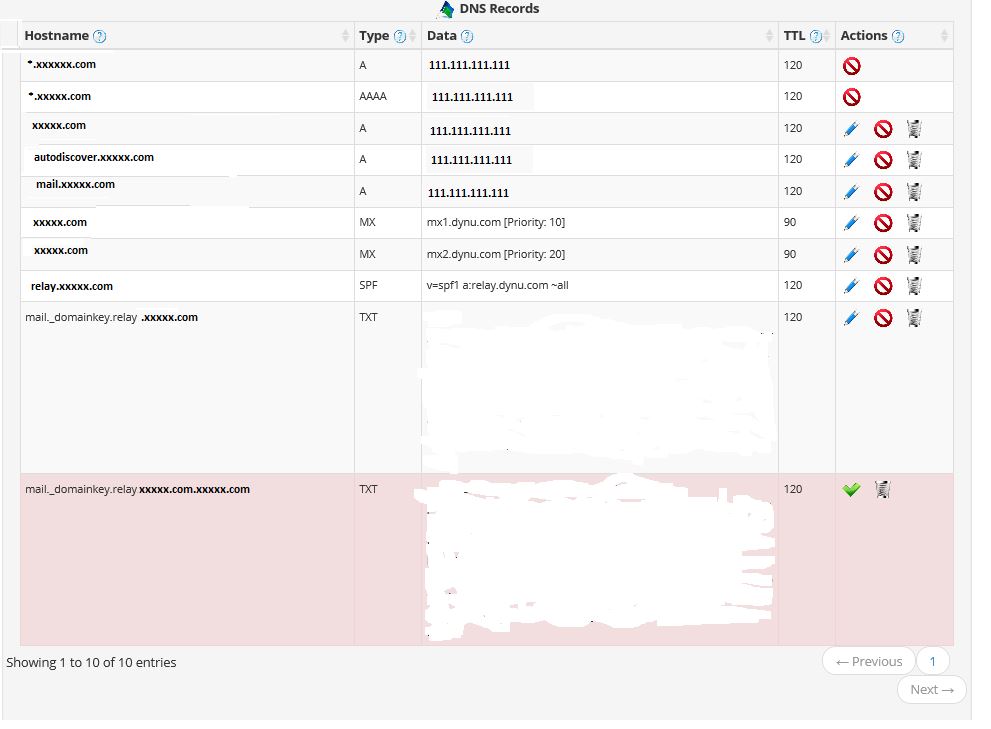
You will need to do some DNS set up in dynu. Some of the records are set up automatically as you configure your services. Other’s you will need to set up manually:
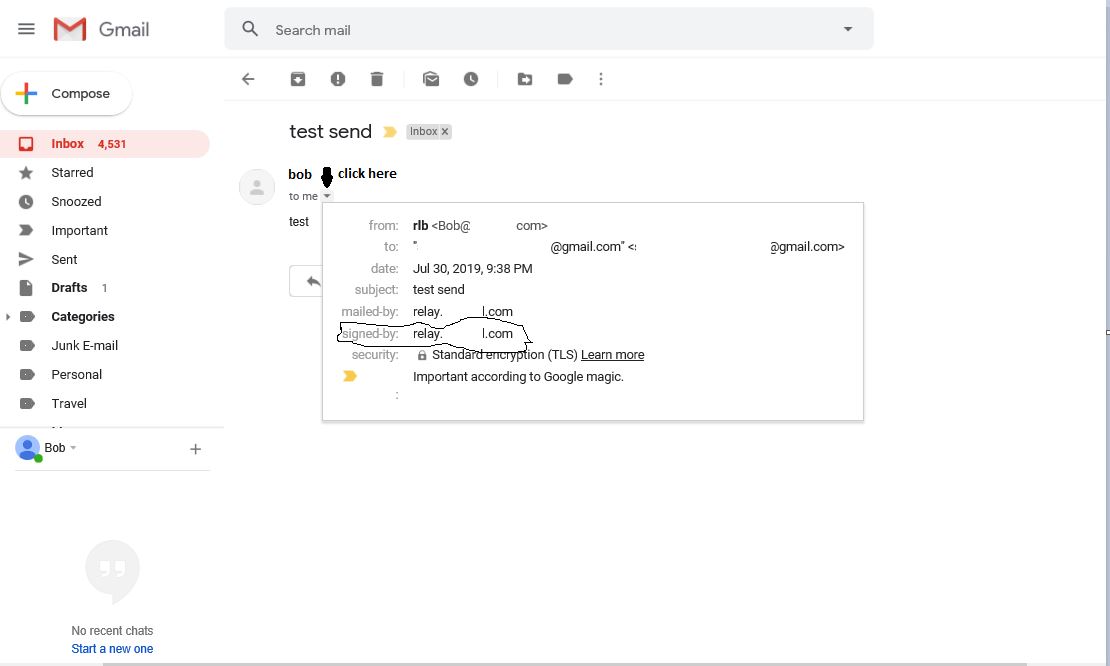
You can test your email and digital signature by sending an email to a gmail account. The screen shot below shows dynu has sent digitally signed my outgoing email. That’s sort of a guarantee to the recepient that the email was sent by me.
That’s it! Unless you want to use signed certificates. By default Exchange will create self-signed certificates. That means when you try to access Exchange from a web page, you will get certificate warnings. Not a big deal really, except certificate errors can be disturbing for some people and the errors will require a few extra clicks to get through. Using self-signed certificates is not a wise thing to do in a commercial environment but for a home lab, using self signed certificates might not be a big deal. In the end, it’s up to you determine if you need your SSL certificates to be issued by a Trusted Certificate Authority. In my case, I didn’t need trusted SSLs but I decided to through the process of getting the trusted SSL created because this was a learning project.
SSL Certificates for Your Exchange Lab with Letsencrypt.org
Signed certificates can be quite expensive for a home lab, or you can find certificates in the $15-$25 range. Or you can get free certificates. Free is good, especially for home users. Letsencrypt.org is a Trusted Certificate Authority that offers free trusted SSL certificates. There is a minor annoyance you will need to put up with – the certificates are only good for 90 days. After that you will need to renew BUT… – the process can be automated. (I’m not going to get into that here). Incidentally, if you want to get a trusted SSL certificate, you will need use your own domain name. If you are using a dynu subdomain, you won’t be able to get a trusted SSL because you don’t own the dynu domain, and there’s no easy way for Certificate Authority verify you own the subdomain
Before generating your certificate, you will need forward port 80 on your router to your mailbox server (as described previously). Even if you’re not listening on port 80, port 80 still needs to be forwarded to your mailbox server. Otherwise the letsencrypt SSL genetation will not work
To download the ssl generation software, go to https://github.com/PKISharp/win-acme/releases
download the latest win-acme.vxxxxx.zip file then unzip the file into a convenient folder
I had difficulty figuring out how to get the entire letsencrypt SSL generation process to work. I was able to generate the SSL but couldn’t upload the certificate. It would tell me I had a bad password. Then all of sudden, after multiple tries, I saw the several certificates in the Exchange Admin Center. I do not know how they got there. I’m going to explain how I THINK I was able to upload the SSL Certificate but I was never able to recreate the entire process beginning to end. In other words, take this section with a “grain of salt” Caveat emptor.
One thing to know – When I was troubleshooting, I tried recreating the certificates over and over again. Then I was temporarily locked out from generating new certificates because I generated too many certificates in an hour (over 5, I think). Then I got wise and was careful not to generate more than 5 in any one hour. After several more tries, I was locked out because I created too many certificates in a week. Now that it’s been a week, I’m going to try again.
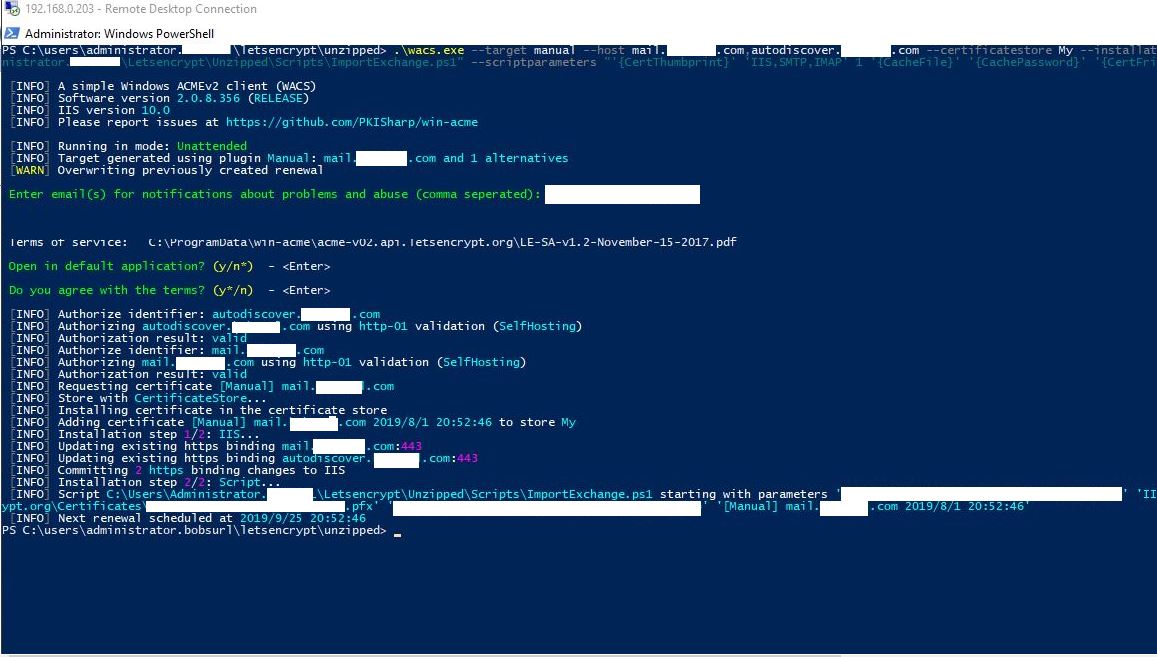
I will attempt to repeat the process so I can document how I was able to generate and upload letsencrypt certificates. When I started the process, I was confused about how SSL encryption generation works. At the beginning of this article, I mentioned a Lynda.com video. The instructor generated a certificate from the Exchange Admin Center, and sent the certificates to a Certificate Authority. They sent him back a signed certificate. That’s not how the process works with letsencrypt. Letsencrypt will generate the entire certificate. Run the command below, the certificate get’s created, then you upload the certificate into Exchange. To generate the certificate, open a cmd prompt prompt and navigate to your unzipped folder and run the following command:
.\wacs.exe –target manual –host mail.[your domain name without the brackets].com,autodiscover.[your domain name without the brackets].com –certificatestore My –installation iis,script –installationsiteid 1 –script “C:[the directory location of your unzipped files]\Scripts\ImportExchange.ps1″ –scriptparameters “‘{CertThumbprint}’ ‘IIS,SMTP,IMAP’ 1 ‘{CacheFile}’ ‘{CachePassword}’ ‘{CertFriendlyName}'”
As the command runs, it will prompt you for your email adress with a couple of yes/no prompts. For the yes/no prompts, I pressed enter and took the defaults.
Wacs.exe stores the certificates at:
C:\ProgramData\win-acme\acme-v02.api.letsencrypt.org\Certificates
Run the wacs.exe command interactivey as follows to get the pfx password. You will need it to import the certificate.

Copy the pfx password (See screenshot above. The Screenshot is a little small, but big enough to read). You wll need it later.
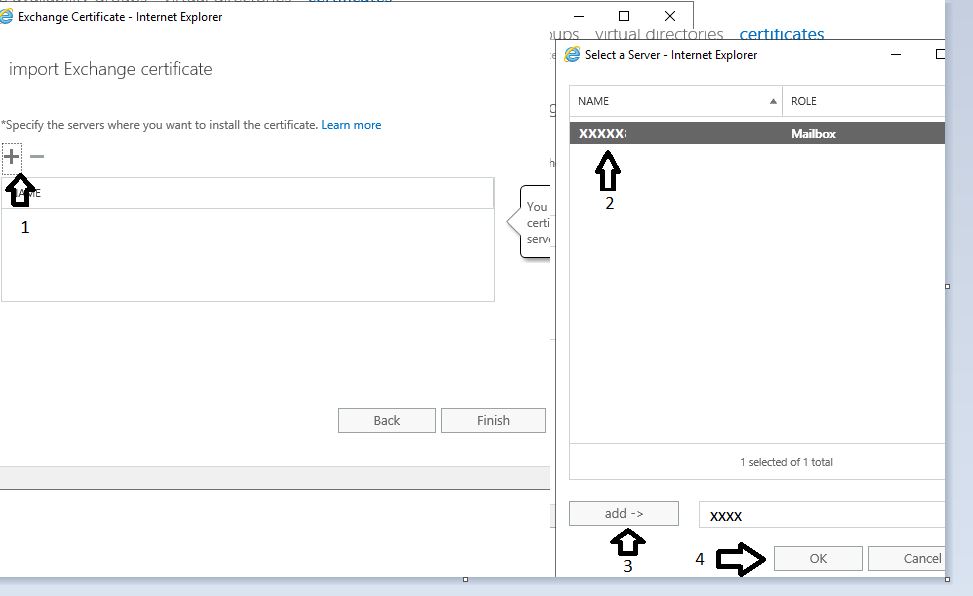
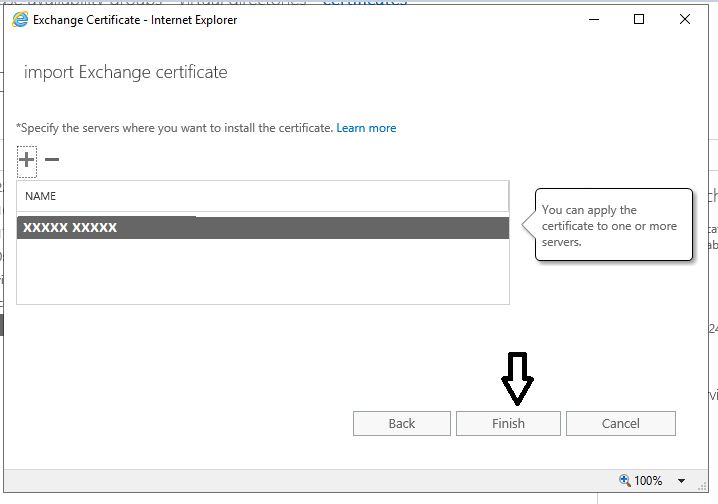
Follow the steps below.
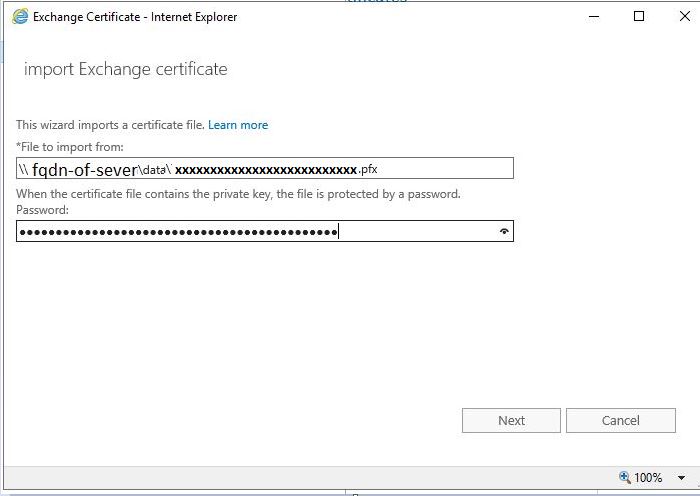
Copy the .pfx file in C:\ProgramData\win-acme\acme-v02.api.letsencrypt.org\Certificates to a share folder. Make sure you have access to the folder. The .pfx file must be imported from a UNC share. You will get an error if you try to access the file from a regular Windows folder. When you specify the path, be sure to use the FQDN. It won’t work unless you use the fully qualified domain name.
Use the password you copied when you ran wacs.
As I mentioned before, this is how I think it should work. I attempted the process many times and couldn’t get it to work. Then all of sudden everything started to work and I don’t know what I did. When I attempted to re-run the steps, it told me I already uploaded the certificate. I THINK one or more of the times when I attempted to upload the certificate, the upload process completed even though it gave me an error. It happened again when I tried to recreate the process for my screenshots. This all started when I didn’t know where to look for the pfx password. I received many errors telling me I didn’t have the correct password. When I finally found out where the password was (interactive wacs.exe above), and I entered the correct password, it told me my certificate was already uploaded. When I tried it again to get the screenshots, and attempted the certificate upload with the correct password, it told me I couldn’t upload the certificate because the certificate was already uploaded. But when I looked, the date and time on the certificate were current. I tried to delete the cert from the Exchange Administrative Center to see if I could upload it without an error but it said I deleting the certificate would cause Exchange to crash.
I ass-u-me if I entered the correct password when I tried to import the certificate the first time, the whole process would have worked normally.
A couple of things about using SSL certificates. First, be sure to use HTTPS when accessing web services. Second, remember the certificate is tied to the domain name. I got certificate errors when I tried to use localhost.
It’s easy to change the shortcut to the Exchange Administrative Center to use the FQDN. mail.xxxxxx.com

You may need to put the local IP address and FQDN in your c:/windows/system32/drivers/etc/hosts file. Since you are using a dynamic IP domain name, I find accessing internal resources using an external (dynu.com) FQDN with a dynamic IP doesn’t always work. Accessing mail.[domainname].com works fine from outside your network but not always from inside.
I hope this writeup has been helpful. Good luck with your home lab projects.
Summary –
dynu.com offers cost effective ways to make Exchange work in a home lab – $30.97 a year. Much cheaper than leasing a Static IP from your ISP
Letsencrypt is a way to get free SSL Certificates. The process is simple if you know how, and I described the process to you.