Category: Articles

Job Search Recordkeeping

(Click above for full article with screenshots)

It’s a good idea to keep a thorough record of all jobs you apply for. If you are on unemployment, your state unemployment division will likely require you to keep a record of your job contacts. Even if you aren’t collecting unemployment, it’s still a good idea to keep a detailed record of your applications.

For example, Colorado Unemployment requires you to keep a record of:

• What action you took
• How you applied for the position
• The type of work you were looking for
• The person you contacted, a telephone number,
email address or other reliable contact information
• The outcome of the contact

I keep the information in an Excel spread sheet. Excel is very useful for keeping a list of all my applications. Its search feature makes it especially useful. Years ago, I kept a paper list. I discovered paper lists aren’t handy if I want to search through the companies and jobs I applied to in the past.

Click here for sample spreadsheet

I also added the date, the employer, the website, and a few other fields. If I have an email or phone number, I will specify under employer. If the employer is a recruiting firm, I also include the name of the company they are submitting me to. That way I have a record of the actual company I applied to. That will come in handy if I need to search for companies I applied to. Also, some employers will not accept resumes from recruiting firms if you already applied with them.

Most of the jobs I apply to are on-line. The jobs are listed on job boards or employer websites. Often the job board will contain a job desription with a link to apply for the job. Sometimes the link is to an employer’s website, sometimes the job board will send your resume and cover letter to directly to the employer. I keep a copy of the link under the column “Job Website”.

“How contacted” will contain information such as if I applied via a job board, via a company website, or via email etc. I also specify if I submitted a Resume or both a Resume and Cover letter.

Most jobs will display a message and/or email you that you successfully applied. I keep a copy of the message under the “Confirmation” column.

Some employers will ask where you saw the job posting, so I put that information that under the “Job Board” column.
Most company career sites will ask you to set up an account. I keep the account information under the column “Logon to Employer Site”. I don’t put the actual password I used, instead I put hints to help me remember the login and password.

Job Board Hints

I review the job boards and keep a record of every job I apply for
Here are some of the job boards I visit:
indeed.com
linkedin.com (jobs)
dice.com
monster.com
careerbuilder.com
glassdoor.com (jobs)
ziprecruiter.com

Be aware that some job postings will not direct you to an application page. Some of the links will ask you to provide an email before you can apply. Sometimes, that’s OK. Other times the posting will scrape job listings from other sites and ask you to provide email and other information before directing you to the application page. If you can skip the inquiry, I recommemd you do. Unfortunately it’s not always easy to tell if the link is legitimate or if it’s gathering email so they can send you spam. When in doubt, go directly to the company website and apply through their careers page.

The job boards enable you to limit the number of days back to search. This is useful if you search the boards every day. They’re all a little different, but generally you can limit your search to 1 day back, sometimes 3 days, most will allow you to limit your search to a week back. Look for links such as “advanced search”, “date posted”, “filter”, or similar. I do not see a similar feature on Dice, but Dice does have a “sort by relevance/date” link so you can put the newest postings at the top.

Other Record Keeping and Job Application Hints.

I use an email address dedicated for my job search. This helps me keep my job search emails separate from my regular emails. This makes it less likely I will miss an important job notification. Since I use Microsoft Outlook, I have my Outlook configured to flag incoming job search emails with a special color and musical tone.

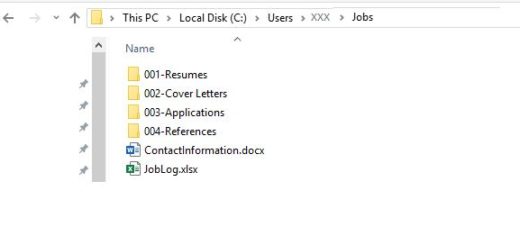
In addition to my log, I keep a “Jobs” folder with several subfolders.

It should be fairly intuitive what most of the folders are used for.
Resumes go in the “001-Resume” folder. I have several different versions of my resume, depending on what I’m applying for.
Cover Letters go in the “002-Cover Letters” folder. Again, I have several different versions of my cover letter, depending on what I’m applying for.
I keep PDF copies reference letters and reference contact information in my “004-References” folder.
My “003-Applications” folders may not be as intuitive at first glance, but it’s a very important folder.
Under “003-Applications, I create an employer sub-folder when I apply for a job. If I apply more than once with an employer, I add the new job info to the folder. Sometimes I may need to create sub-sub folders.
I copy a resume from my 001-Resume folder and I copy a cover letter from my “002-Cover Letter” folder into the employer folder.
I then customize my resume and cover letter to match the job. I may change the order of the items in my resume or cover letter. I may add skills not listed in my original resume to match the job description, and I may change the words and terms in my resume and cover to match the job description. This can be useful for a technical role when …

Hiking in Jefferson County, Colorado

Jefferson County, Colorado is a suburban county in the Denver Colorado metropolitan area. The county extends from the Denver suburbs into the mountains. (Locals call mountains outside of Denver the “foothills”). Jefferson County has a wonderful open space park system. Since the parks are all close to Denver, the parks are ideal for city-dwellers wanting to go on day-hikes. There are many, many, trails that can easily be hiked in a half-day or less. A few are all-day hikes. Overnight camping is allowed in some parks with a reservation. Otherwise, the parks are open an hour before sunrise until an hour after sunset. Plan your hikes. I was on a hike once and barely completed my hike before closing time. Jefferson county parks are paid for exclusively with tax dollars, and unlike the state parks, there is no fee to visit the Jefferson County parks

According to their website, “The Jeffco Open Space system includes 56,000 acres of preserved land, 28 parks, and 244 miles of trail.” A few of the parks are in the city, but most are in the foothills. All of the parks are within an hour’s or so drive or less from the city. Most of the parks have multiple trails varying in length and difficulty. Some of the trails are relatively flat, others trails are steep and rocky. Depending upon the park and trail, the trails are suitable for hikers, bikers, and equesterians. Check the website before you go. Some trails are hiker only. At least one trail alternates on a weekly basis between hiker only and biker only.

Most trail heads have out-house style restrooms, some have running-water. There are also information boards with a park map, park literature, and maps park guests can take with them. The park maps are always well-stocked. I go to the parks weekly and have never seen the trailhead to be out of maps. You can also print maps from their website. It’s a good idea to check the maps before you go so you can plan your hike:
Jefferson County Open Space web site

Preparing for your Hike

The first thing and most important is to always, always, always, tell someone where you are going and when you expect to be back. Jefferson County parks have many visitors, and you will almost never be completely alone, but it’s still an important safety precaution to let someone know where you will be going. The next most important thing is to bring sufficient water. It’s important to stay hydrated. It’s not a bad idea to bring a snack. Depending on the length of the hike, a granola bar or trail-mix should be sufficient. If you plan to be on a longer hike, bring more food with you. Dress appropriately. Weather can change, so be prepared for changes, especially rain. Wear appropriate shoes. I recommend hiking or work boots. I see many people on the trails with sneakers. Most of the time sneakers will be OK, but I still recommend heavy-duty footwear. Don’t wear sandals or flip-flops. Most trails you will regret it if you wear flimsy shoes. Wear a hat. If you wear shorts or tee-shirts, be sure to put on a quality sun-screen. I bring a hiking pole with me when I go hiking. I find the pole helps me keep my balance, especially when I’m headed down a steep trail.

Hiking with your Dog

Most of the trails in Jefferson County are suitable for dogs. Your dog will enjoy the hike as much as you do. Please, keep your dog on a leash. Park regulations require dogs be leashed. I’ve seen park rangers admonish people who don’t leash their dogs. The irresponsible dog owners tell the rangers their dogs don’t need to be on a leash. Just about every time I encountered a park ranger with my dog, the ranger thanks me for having my dog on a leash. Leashing dogs is an important safety precaution, and a common courtesy.

Be sure to bring enough water for your dog. The trails can be hot and strenuous, especially for dogs. I have a big dog and my dog needs more water than I do. Bring a bowl to put the dog water in. I bring dog treats. For day-hikes treats are not always a necessity, but your dog will appreciate it. Finally, bring a small a garden shovel and plastic bag to clean up after your dog. My dog rarely goes while we’re on the trail but he does go occasionaly. Also, I bring some towelettes to clean my hands after I scoop dog poop.

Recommendations

Different people have different fitness levels and different levels of hiking ability. It would be difficult for me recommend a hike for you, but I can tell you about some of the hikes I like to go on. When I’m in the mood for a short hike with a bit of an uphill climb, I go Pine Valley park. The hike only takes me a couple of hours. South Valley park is next to the Lockheed-Martin facility on the outskirts of town. The trail is about two miles in length, is relatively flat though there are slight inclines and declines. South Valley has some handsome sandstone rock outcroppings though rock climbing is prohibited. If you want to do some rock climbing, go to North Table Mountain park. Flying-J Park is outside of Conifer. It is longer than South Valey, nicely forrested, but relatively flat with slight inclines and declines. For most people, Flying-J less than a half-day hike. If you want to try something more challenging, try Elk Meadows, in Evergreen. The trail is fairly long with a significant elevation gain. Others may be able to hike it faster, but for me, it’s an all day hike. My favorite park is Reynolds Park. The hike is a little less than a half-day, parts of the trail are steep and rocky. The when I get to the ridge line at the top …

Wyze Cam Security Cam

I recently decided I wanted an outdoor security camera but I didn’t want to spend much money.  After a bit of research I found a bargain camera that includes a bunch of features. The Wyze Cam can be purchased for $19.95 plus $5.99 shipping. The camera has two way audio and includes 14 days of cloud storage.  The camera will upload 10-15 second video clips every time it detects motion.  If you want to store continuous motion or more than a 15 second clip, you will need a micro SD card.  The camera supports up to 32 GB. The camera out-of-the-box  is not suitable for outdoor use. You will need an enclosure.  I bought one on Amazon for $16.99.  The camera is powered by a micro USB/USB cable plugged into a power adapter. If you want to use the camera outside, you will probably need a longer cable than what’s included.

The camera is a bargain does just what I want it to.  It sends me an alert to my android phone every time it detects motion in my driveway. I can view the clip from the phone. The camera also supports iPhones. Next, I plan to set up another cam at my front door.  When someone comes to the door, I can see who’s there and even ask what they want without needing to come to the door.

See my Youtube video for the details: Video


 …

RCA RPJ116 Multimedia Projector for PowerPoint Review

I saw this projector in Walmart for $89. I’ve been wanting a projector for PowerPoint presentations but didn’t want to invest several hundred dollars for something I wouldn’t use very often. I wasn’t sure if this projector would do the job but I knew I could take it back if it didn’t work out. I discovered the output is a little dim but would do a half way decent job in a dimmed room.  The projector is OK for me, but I wouldn’t recommend it for someone who gives frequent presentations.  See the YouTube video for details.…

How I Passed My CISA Exam

The company I work for has been sold. Most of the technology associates expect to lose our jobs in the upcoming months. Fortunately, the companies are offering a generous severance package. As the days counted down towards business close, we were also offered in-house professional training on a variety of subjects, many of which included vouchers for certification tests. Due to low demand, CISA training was not available for in-house training but the company offered to pay for independent study classes. The company would reimburse us for the certification exam if we passed. I took several of the instructor led classes and was approved for an independent study class for the CISA.

CISA Training Classes

I selected the CISA class from Alan Keele at www.certifiedinfosec.com. The class is a self-paced 180 day subscription at a cost of $449.95. He does offer a free trial lesson consisting of a pre-assessment test, training class, and a post-assessment test. I found the trial was a good representation of the general courseware. Keele’s training consists of assessment tests and narrated slides. One of the nice things about the class is the instructor is available to answer questions via phone or email. The instructor promptly answered emails, and promptly responded to a voice-mail I left.

The class is broken down into the five CISA domains plus an extra series of lessons for “Consolidated Business Continuity and Disaster Recovery Topics”. Each domain consists of multiple lessons, each with assessment tests and a final assessment test for each domain. The class offers four final exams consisting of 150 questions each (As of this writing, the CISA exam is 150 questions). You can take the assessment tests more than once, but the order of the test questions will vary each time you take the test. The final exams are random questions from a pool – each time you take the final exam you will get different questions in a different order. The recommended passing score is 95%. I passed all my assessment tests with 95%+ but did need to take a few more than once. My final exam scores ranged from 85-93%.

The material seemed to be geared towards helping the student answer test questions. The slides are narrated and  consist mostly of a bunch of test answers without the questions. When I spoke with Keele on the phone, he told me that was the strategy for helping students pass the exam. Since the exam is multiple choice, if the student could recognize the answers, the student will be able to recognize the answer even if the questions were unfamiliar. The CISA test is multiple choice – only one correct answer per question. The assessment questions from the class are in multiple formats including multiple choice, true-false, matching, and “select all that apply” (multiple answers for a question). Although not all class questions are multiple choice, the instructor told me his question/answer format is an easy way of combining multiple questions into one.

After the student answers an exam question, the instructor would provide text and narrated answers. In most cases, the instructor read the correct response, but did not provide much of an explanation. In some cases, the instructor would point out questions and answers that were plain silly and that ISACA’s answer is not always the same the way as an experienced professional would answer. I noticed this when I took the test and I’ve heard the same thing from other people who have taken the exam.

The wording on the narration and slides were quite formal. This format was useful for some of the test questions but not helpful for a true understanding of the material. I found myself going to Youtube to get a better understanding. In my search, I found a series of short lessons from Hemang Doshi. Doshi has a very thick accent and my first inclination was to stop watching and look for another video. I decided to watch his video and found his video very helpful for an understanding of the material. Doshi’s videos do an excellent job of explaining the concepts in very simple terms. He uses a keyword approach – “if you see this keyword”, then “look for this answer”. Doshi’s videos are simple – a question, keyword, answer approach compared to Keele’s formal approach. I found both classes together to be instrumental in my passing of the exam. I did find the practice tests and material from the two to be very similar, but the approach used in the lessons were quite different.

Doshi has quite a few videos, here is a nice sample of several of his videos:

https://www.quora.com/What-is-the-best-approach-to-preparing-for-CISA-examination-without-prior-knowledge-of-auditing

Doshi also has a mostly free site. The site consists of videos, flash cards, study material with assessment test for each domain, and a final 150 question test covering all domains. The site also has a “30 day strategy for CISA Success”. The 30 day strategy is a series of 10-20 questions to be taken one test per day over a period of 30 days. He asks for $30 for the “30 Day Strategy” to be paid upon passing the exam. No credit card or registration is required to take the lessons. Just pay after you pass the exam. I opted for this training, but in hindsight the site offers so many practice tests, it probably wasn’t really necessary to take the 30 day strategy. Since I did use the material and passed my CISA, I did pay the $30 upon receiving my score.

WARNING, WARNING, WARNING, WARNING

The site is supported by pop-up ads and I received virus warnings when some of the ads displayed. The site itself seems to be fine but the pop-ups may not be. My recommendation is to have a good virus checker and close the pop-ups before they have a chance to populate. I would have recommended a pop-up blocker but the practice tests don’t work properly with a pop-up blocker on.

WARNING – Be careful when going to the …

0

Pitney Bowes stamps on QL-700 no monthly fee

I recently purchased a Brother QL-700 label printer on sale at Staples for $39.99. A pretty good deal. As I was reading through the promotional material, I discovered that I could sign up for the Pitney Bowes pbSmartPostage service for no monthly subscription fee. I’ve always wanted to be able to print my own stamps, but I could never justify paying a monthly subscription fee. This was my chance. I went to the Pitney Bowes site to sign up. Hmmm, there’s nothing here that lets me sign up without paying a fee. It took a Google search to find the “free” sign-up link. That’s.

www.pb.com/brother

I went to the site and was redirected to the sign-up URL. Sign-up was pretty easy, It didn’t ask even me for a credit card. Just enter a few personal details such as name, email address, and physical address (no PO Boxes allowed). I don’t know if I did something wrong, but during the process it said they were going to send me a free welcome kit, then proceeded to display an invoice showing $0.00 for the welcome kit with $10.00+ shipping charge. How are they going to get the shipping charge from me? Didn’t ask me for a credit card. Well, they never charged me but they never sent me the kit either.

Now that I had access to the site, I was able to get an idea about how the plan actually worked. I already knew I had to buy my label rolls from Pitney Bowes. The choices at this time are $17.99 for 200 labels or 39.99 for 1000 labels. Plus tax. Do the math. $17.99/200 + Tax = more than $.09 per stamp. The other options are less expensive but still add quite a bit to the cost of the stamps. The labeler detects the kind of rolls, so the software won’t let you print stamps on “unapproved” rolls. You do get ½ cent discount on postage but the discount does no good when you’re paying such a high price for the supplies.

If you’ve seen pictures of the printed stamps, you may have noticed an orange stripe at the top that says pbSmartPostage.com. The stripe comes pre-printed on the rolls. That’s fine for the stamps, but if you intend to print both stamps and labels on the same roll, then your labels will have the orange stripe too. The alternative is to switch rolls every time you switch between labels and stamps.

I later learned that you can buy stamp sheets for $7.49; 5 sheets, 25 labels per page, 125 labels in all. You can print the stamp sheets on a regular laser printer. The gotcha is the sheets come with serial numbers. In order to print on the stamp sheet, you need to enter the serial number of the sheet.

You end up paying for the “free” service by paying and inflated charge for supplies. If you pay the hefty charge for the fee subscription, then you can print the stamps directly on the envelope and avoid the hefty charge for the stamp rolls and sheets.

Ordering supplies is relatively easy, just enter your credit card number and order. Pitney Bowes didn’t charge me for shipping, but they did add tax. I ordered the $17.99 roll on the weekend and it arrived in the mail on Thursday.

In order to pay for stamps, you need to fund your account. When you click on “Add Postage”, it will tell you have no funds. You can set up a Reserve Account or enter your credit card information. THEN you can fund your account. It gives you several options for funding with specific dollar amounts of $20, $50, or $100 or you can enter your own amount. BUT… the amount needs to be in even dollar amounts and it won’t let you enter an amount less than $10.00. It does maintain your account in ½ cent increments. When I printed a single stamp, it decremented my account by 46 ½ cents.

I was really disappointed when I discovered the available postage classes were very limited. It allows various types of first class mail up to 3 ounces and media mail. That’s it. One of the main reasons I signed up is so I can print Priority Mail stamps. Tech support informed me Priority Mail requires a bar code, and bar codes go on the address label. Since the basic service doesn’t print address labels, no Priority Mail.

If I knew then what I knew now, I probably wouldn’t have signed up for the service. Printed stamps are very expensive, and the types of mail you can send are very limited. The only thing you MIGHT get is the convenience of not having to go to the post office to buy stamps.


Check out my YouTube video

0

How I got to WordPress

Several years ago, I led a three state district of a worldwide communication and leadership organization. One day I received a call informing me our website was being used as a base to attack other websites. We were hacked. We immediately shut down our site and began investigating alternatives for a new website. We rehosted our site and choose Joomla as the Content Management System. As I was learning about Joomla, I decided to build a personal Joomla website. Once I got my site going, I rarely updated it. Eventually my personal Joomla site was hacked (vandalized). Luckily it was a simple fix to restore the site. I changed the password but over a few months it was hacked two more times. When I eventually updated the version of Joomla, the hacks stopped.

Then I got a call from my hosting provider. They encouraged me to upgrade to a new hosting plan. They offered me a “deal” to switch. In order to switch plans, I would need to rehost and rebuild my site. I was apprehensive about that idea but eventually decided to make the switch. I allowed a couple of weeks before my old plan expired to convert to the new plan. The conversion was actually fairly painless. I got my new site up and running with plenty of time to spare.

Since I hadn’t made any updates in quite a while, I decided to make some changes. I ran into a technical issue and called tech support. Customer Support did manage to help me resolve my problem but they told me they don’t get many calls for Joomla. The majority of their customers were on WordPress. I was still running on a very old version of Joomla so I decided to upgrade. I spent quite a bit of time searching for a new Joomla template but couldn’t find one I liked.

“Can’t find a template I like”

“Most of their customers are on WordPress”

“I’ve been hearing a lot more about WordPress lately than Joomla”

The organization I belonged to switched to WordPress a long time ago, and a friend’s site was on WordPress.

I decided to make a switch. I purchased a couple of “temporary” domain names to use while I built my new WordPress sites. My primary Joomla based domains remained active while I learned, installed, and customized my new WordPress, sites. Then I copied the articles from my Joomla site and posted them into my new WordPress site. When I got new my WordPress site looking the way I wanted it to, I pointed my primary domain names to my new WordPress site. My conversion to WordPress was successful.

Getting my WordPress site has been quite a learning experience. I couldn’t have done it without a couple of my best friends. Google and YouTube! See my YouTube videos about how to build a WordPress site on Godaddy.

0

Do You Fear Public Speaking?

Fear of public speaking is a very common ailment. There’s actually a name for it: glassophobia. Maybe fear isn’t always the exact word. How about aversion to public speaking? Anxiety? Discomfort? Stress? “Just not your cup of tea”? Do one of these apply to you? Why?

Fear is a normal human emotion. Fear warns us of danger – it’s a survival instinct. Consider the fear of riding a motorcycle down the highway during rush hour at 110 mph with no helmet. What would failure entail? Loosing control of the motorcycle? Crashing? What would be the result? It would probably be serious injury or death. Now, that would be a rational fear.

Now consider a public speaking engagement. What would failure at this engagement entail? Putting forward a poor performance? Making a mistake? Freezing or forgetting? What would be the result? Embarrassment maybe, but serious injury or death would be very unlikely. This does not necessarily mean glassophobia is an irrational fear, but the fear of public speaking is definitely not part of the human survival instinct. Not in the life or death sense anyway. Therefore, consider fear of public speaking as an unnecessary fear.

Fear of public speaking can be detrimental to your career. Think about what would happen if you were called upon in a meeting and couldn’t speak. What would happen if you had that “great idea” and couldn’t present it – or worse – someone else, a rival, could and did? These are examples of why fear of public speaking can hinder your corporate survival.

The best way to overcome an unnecessary fear is to face it. Start by selecting a topic you know about or would like to know about. Then prepare a speech. Research the topic thoroughly so you know it inside and out. Then practice in private. Practice over and over and over. One of the key elements of overcoming the fear of public speaking is preparation. The keys to preparation are to thoroughly research your topic, then practice, practice, practice. When you are comfortable with your speech and your material, practice in front of in front of family or a few close friends. The more prepared you are, the less fear you will have. You will likely find practicing in front of even one or two people can be completely different than practicing by yourself. Ask those people for feedback. Even if they don’t understand technical material, they may be able to comment on your delivery. They may notice idiosyncrasies you weren’t aware of. Then ask a trusted colleague to listen to you practice. Your colleague may be able to comment on your technical material. As you receive feedback, revise, revise, revise, then practice, practice, practice.
Listen to the advice of your family, friends, and colleagues but remember you are the one giving the presentation. If the advice makes sense, follow it. If the advice doesn’t make sense or doesn’t match your personal style, don’t follow it. If you receive contradictory advice, use the advice that makes the most sense to you. Use your judgment and be comfortable in your own skin. Being comfortable in your own skin is an important step in overcoming the fear of public speaking.

As you practice, revise and improve your speech. Eventually you will know your material inside and out. Then you can begin to put aside fears of failure. Imagine the audience listening attentively. Imagine the applause you will receive at the end of your speech. And you WILL receive applause. As you imagine success, your confidence will grow. Ever hear the advice for nervous speakers to imagine the audience members in their underwear? If that works for you, then use it, but better advice for most speakers is to imagine success. Your audience is on your side. They want you to be successful. Almost as much as you do.

When the day of your presentation comes, don’t worry about being nervous. Keep in mind that even experienced speakers will feel some degree of fear and nervousness. A little nervousness is actually desirable. Your nervousness will cause your body to release adrenaline. That adrenaline will help get you “pumped”, which will help your passion and enthusiasm shine through.…

0

Updated: Porting a Home Telephone Number with Verizon

I originally ported my Century Link number to magicJack. With a few minor annoyances, my port to magicJack did the job. magicJack costs about $35.00 a year. Google Voice is free so I decided to port my magicJack number to Google Voice. Well you can only  port a mobile phone number to Google Voice.  Google Voice will not accept ports from landlines or VOIP services.  The trick is to port your number to a mobile no-contract phone, then port the no-contract phone to Google Voice. The cost is about $10-$20 for a phone (such as TracFone), then about $10.00 for minutes, and $20 for the Google Voice port. I did that and was ultimately successful, but getting there was a major ordeal.
See my YouTube video here: https://www.youtube.com/watch?v=8K8FH7YaFEA

I orginally ported to MagicJack as described below, but my YouTube video above describes a cheaper solution.

My original article is here (before I ported to GoogleVoice):

Verizon offers a Verizon Home Wireless service. If you’re already on the Verizon Plan, adding Home Wireless is about $20 extra + tax and fees. That’s a lot less than a landline. My plan was to port my Century Link Home telephone number to Verizon.

In theory, I should be able to do that.  [After I signed up and purchaced the home wireles device, and after I discovered my home phone number wouldn’t port,] Verizon informed me that due to “monopoly regulations” they were unable to port my Century Link phone number to Verizon. They could port other Century Link customers but couldn’t port anyone on my exchange.  All the literature I read said phone service providers are required to allow porting. Century Link said they weren’t preventing the port, Verizon said Century Link wasn’t blocking the port. They were unable to port due to an “anti-monopoly law”.

I called the FCC.  The FCC tried to be helpful but was unable to give me an explanation. They did say there were exceptions to the rule that required providers to enable porting from one provider to another.

I’ve been using my home phone number for 30 years. Changing my  home phone number would have been a big deal. I didn’t want to give up my landline number. Then I tried porting my number to MagicJack. Magic Jack is a VOIP service, costs about $40 a year. It cost about $25.00 to port my home number to Magic Jack, Magic Jack couldn’t receive incoming calls for several days while the porting was being processed, but after a few days, my number DID port to Magic Jack. Then, I forwarded my number on MagicJack to my new Verizon Home Wireless number. Now when someone calls me on my old home number, it will ring on my Verizon.

So now I have two numbers. My old home number and my new Verizon number. If I call from Verizon the CallerId will show my new number instead of my old number. If someone calls me on my old number, it will ring on my Verizon Home Wireless phone . At least my old number is still valid and I don’t need to inform EVERYONE to use the new number. Be aware that Magic Jack limits calls to about 1 hr. If someone calls you on your old number, and it ends up being a long call, Magic Jack will hang up on you.

 …